How to add template containers
This tutorial will introduce you to template containers. We will develop a small plugin that provides the data for displaying a placeholder image and text in a container of the template plugin. You will also learn about the plugin containers in plentyShop LTS and all options to integrate your own content in the template.
Step 1: Installing the template
If you haven’t already set up a template in your PlentyONE system, do it before you start developing the template container plugin. In this way, you have your test environment ready and can directly check your coding output.
Step 2: Creating the plugin files
Our plugin is of the template type and integrates with the plentyShop LTS template, i.e. our plugin consists of core features saved in the src folder and design features saved in the resources folder. Our plugin also requires a plugin.json file and a config.json file.
Placeholder/
    ├── resources/
    │   ├── images/
    │   │   └── placeholder.png // placeholder image file
    │   │
    │   └── views/
    │       └── content/
    │           └── Placeholder.twig // template for the placeholder image and text
    ├── src/
    │   ├── Containers/
    │   │   └──PlaceholderContainer.php
    │   │
    │   └── Providers/
    │       └── PlaceholderServiceProvider.php
    │
    ├── config.json // admin's plugin options
    └── plugin.json // plugin information
Step 3: Filling the source files
Our plugin consists of 6 files in total. Two JSON files, the plugin.json and the config.json, two PHP files, a ServiceProvider and a container with the source code of the plugin, as well as a Twig file and an image file. Create these files and copy the code examples.
Code for the plugin.json
{
    "name"                  :"Placeholder",
    "description"           :"Template container placeholder plugin",
    "namespace"             :"Placeholder",
    "author"                :"Your name",
    "keywords"              : ["container", "placeholder", "template"],
    "type"                  :"template",
    "require"               : [],
    "serviceProvider"       :"Placeholder\\Providers\\PlaceholderServiceProvider",
    "dataProviders"         :
    [
        {
            "key"           :"Placeholder\\Containers\\PlaceholderContainer",
            "name"          :"Placeholder",
            "description"   :"Display a placeholder image and text"
        }
    ]
}
This plugin.json is similar to other files, but it has an additional key-value pair: dataProviders is required for linking the content provided by this plugin to the template plugin. key specifies the container. name and description are texts for the PlentyONE back end.
Code for the config.json
[
    {
        "tab"                         : "Placeholder settings",
        "key"                         : "placeholder.text",
        "label"                       : "Placeholder text",
        "type"                        : "text",
        "default"                     : "This is a placeholder"
    }
]
This config.json is kept very simple and enables you to define the text that is displayed below or next to the placeholder image.
Code for the ServiceProvider
<?php

namespace Placeholder\Providers;

use Plenty\Plugin\ServiceProvider;

class PlaceholderServiceProvider extends ServiceProvider
{

    /**
     * Register the service provider.
     */
    public function register()
    {

    }
}
The ServiceProvider of this plugin is very simple. It contains no fancy logic and is only required for plugin deployment.
Code for the PlaceholderContainer
<?php

namespace Placeholder\Containers;

use Plenty\Plugin\Templates\Twig;

class PlaceholderContainer
{
    public function call(Twig $twig):string
    {
        return $twig->render('Placeholder::content.Placeholder');
    }
}
The PlaceholderContainer is specified in the plugin.json file. It is a completely new source file, a content container which uses the call() method for rendering the Twig template of our plugin. We will create the Placeholder.twig file in the next step.
Code for the Placeholder.twig
{% set placeholderText = config("Placeholder.placeholder.text") %}

<img src="{{ plugin_path("Placeholder") }}/images/placeholder.png">
<h5>{{ placeholderText }}</h5>
A Twig function sets the variable placeholderText. The variable is equal to the value of placeholder.text key in the config.json file. The placeholder text can be entered in the PlentyONE back end.
In line 3, we specify the placeholder image by entering the path of the image. {{ plugin_path("Placeholder") }} is equal to the resources folder in our plugin, i.e. the complete image path is Placeholder/resources/images/placeholder.png.
In line 4, we use the placeholderText variable that we set in line 1 to display the placeholder text below or next to the placeholder image in the content container.
Step 4: Entering the placeholder text
After creating the plugin, we have to add our new plugin to the PlentyONE inbox. Then, we enter the placeholder text in the plugin config.
-
Go to Plugins » Plugin overview.
-
In the list of plugins, click on Placeholder.
→ The plugin config file will open. -
Enter the Placeholder text.
-
Save the settings.
Looking at the big picture
Now you simply have to link the content from our Placeholder plugin to one or multiple containers of the plentyShop LTS template plugin. This can be done in the PlentyONE back end.
-
Go to Plugins » Plugin set overview.
-
Open the plugin set you want to edit.
-
Open the settings plugin whose containers you want to link.
-
Click on Container links.
-
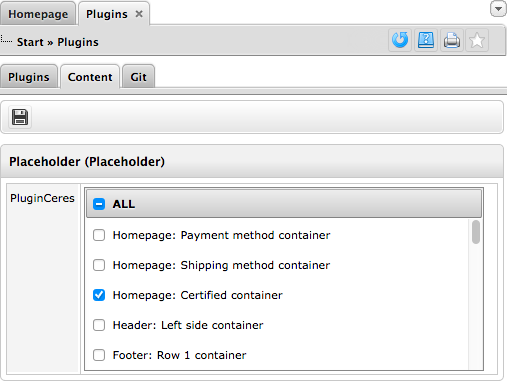
Activate a container in the Placeholder (Placeholder) area, e.g. the Certified container on the homepage.
-
Save the settings.

After deploying the plugins, the content of our Placeholder plugin is displayed in the footer of our online store.
